eCommerce Answers
Find expert answers to all your eCommerce questions, from learning how to start and scale an online store to apps, tools, marketing strategies, inventory management, and more.
Recent Answers
Using a Shopify Online Store to Make In-Person Sales at a Physical Store or Pop Up Setting
If you have an online Shopify store and want to make in-person sales, Shopify POS (Point of Sale) is what you need. Shopify POS is an app that lets Shopify merchants make in-person sales. It lets you process orders, take payments, swipe credit cards, and produce receipts. You can use different forms of payment, like credit cards, cash, or gift cards. The POS app can easily be synced with your Shopify account to keep inventory, and orders synced with your online store. Shopify's online hardware store lets you purchase hardware like a card reader, barcode scanner, or cash drawer to use with Shopify POS.
Asked a month ago
How to Add a Buy One Get One Free Discount on Shopify
A Buy X Get Y Free promotion is a powerful marketing tool and can increase your Shopify store's sales. Shopify lets you easily create Buy One Get One Free (BOGO) promotions for products in your store. There are two ways to create a Buy X Get Y Free discount from your Shopify admin. You can add automatic discounts or use discount codes to offer discounts to only those customers who received the code. Method 1: Create an Automatic Buy One Get One Free Discount Follow these steps to create an automatic BOGO discount: 1. From your Shopify admin dashboard, click on "Discounts" from the menu. 2. Click "Create discount." 3. Click "Automatic discount." 4. Fill in a title for your automatic discount in the "Title" field. 5. In the "Types" section, select "Buy X get Y." 6. Configure the desired settings in the "Customer buys" and "Customer gets" sections. 7. Under "At a Discounted Value," select the "Free" option and enter the number of uses per order. 8. Configure the desired settings in the "Active dates" section. 9. Click "Save discount." Method 2: Create a Buy One Get One Free Discount Code Follow these steps to create a Buy X Get Y discount code: 1. From your Shopify admin dashboard, click on "Discounts" from the menu. 2. Click "Create discount." 3. Choose the "Discount code" option. 4. Enter a name such as buy-one-get-one in the "Discount code" section or click "Generate code" to get a random discount code. 5. Select "Buy X get Y" in the "Types" section. 6. Configure the desired settings in the "Customer buys" section. 7. Configure the desired settings in the "Customer gets" section. 8. Select who this discount will apply to in the "Customer eligibility" section. 9. Under "Usage limits," set limitations for discount usage (limit total discount usage or discount usage per client). 10. Configure the desired settings in the "Active dates" section. 11. You can review your discount code under "Summary." 12. Click "Save discount" at the top-right of the screen. 13. Click "Get sharable link" and copy and paste the link to your discount code. If you're looking for a faster, more automated approach, there is a number of excellent Shopify discount codes apps that can generate discount codes automatically, including Egnition's Order to Discount app. BOGO Discounts Are a Win-Win Buy One Get One Free discounts are sure to win over customers looking for a good deal. Use BOGO discounts to boost sales and AOV, improve customer experience, and encourage customer loyalty. Offering discounts is also an excellent marketing strategy to attract new customers and build brand awareness while also allowing you to clear out old inventory. It's a win-win for all parties involved.
Asked 2 months ago
How to Import Sample Product CSV Files to Your Shopify Dev Store
CSV files provide an easy way to build a beautiful Shopify store. You can import and export products to and from your Shopify store in large quantities as well as bulk edit Shopify inventory with CSV files. As they store tabular data as plain text, CSV files make it possible to quickly populate your store. Follow these easy steps to import sample product CSV files: 1. Log in to your Shopify development store and navigate to "Products". 2. Select "Import" on the right upper part of the screen. 3. Select "Add file" in the center box and search for the sample product CSV file you wish to upload and select open. Optional: If you wish to only make changes to your online store and not other sales channels, then you can deselect "Publish new products to all sales channels". Optional: By selecting the "Overwrite any current products that have the same handle". Existing values will be used for any missing columns box, you can change the product URLs by overwriting the existing handles' values. 4. Select "Upload and continue" to review the details of the products and select "Import products". Once you have imported the CSV file, you will be sent a confirmation email. The Final Verdict Importing CSV files is a fast way to add bulk data to your online store, but it is not the most efficient. There are Shopify apps like Simple Sample Data that will automate this process with a single click. Simple Sample Data provides you with various themes, customizable collections, images, products, orders, and product descriptions. Not to mention it's free to use on your dev store, saving you time and ultimately money.
Asked 2 months ago
How To Remove Image Backgrounds for More Polished Products
Removing image backgrounds is like a photoshopped version of your products—like a filter but better! It'll make your products look like they've been to the gym, got a tan, and had a makeover, making them stand out from the crowd. Plus, smaller file sizes mean faster website loading times, which is like the cherry on top of a sundae. Using Adobe Photoshop Here are 2 cool ways to get rid of backgrounds with Adobe. 1. Cut the Background Open your image in Adobe Photoshop.Add a new background layer by unlocking the image. Click on the lock button on the right panel.Add the new layer by clicking on Layer > New > Layer (or press Shift + CTRL+ N).Drag the new layer behind the image in the right panel by right-clicking on it and dragging it downSelect the Magic Wand tool and click on the background you want to remove. Press the Delete key and there you go! Background removed. 2. Create a Mask Open your image in Adobe Photoshop. Use the Magic Wand or Lasso tool to make a selection around the object you want to keep.Go to Layer > Layer Mask > Reveal Selection to hide the background When you finish either method, make sure to save your image with a transparent background. Please note that like a fancy restaurant, Adobe products require a fancy license to use. But don't let that discourage you, because option 2 may be just right for you! Using an App Optimizing product images has never been this easy Free plan Yes Paid plans 3 packages Features Included in all plans Operation Based on non-expiring credits Don't worry about manually removing image backgrounds—there's no need to break a sweat! I prefer to use an app that automates and streamlines my entire product image editing process like a boss. The All-In-One Image Master app by Egnition not only lets me remove backgrounds and resize and center images with a click of a button, but also gives me the power to set my preferred quality for processed images and choose a format (PNG or JPG). Optimize: Easily remove backgrounds and center product images.Format: Set the preferred quality for processed images and choose a format.Resize: Either resize images and keep their ratio or resize the canvas and center.Bulk editing: Unified pre-set rules deliver the same look and feel for all processed images.Boost SEO: Automatically generate ALT text for product images from a pre-set template. » Read the All-In-One Image Master review Don't Fade Into the Background Remember that removing the background from product images is a requirement for many online marketplaces, such as Amazon and eBay, so I've found that it's worth investing in a method or app that allows me to do this effortlessly and professionally. It saves time and frustration and gives me a polished storefront. » Here are the best Shopify apps to automate product photo editing
Asked 2 months ago
Why You Should Use a Product Review App for Your Shopify Store
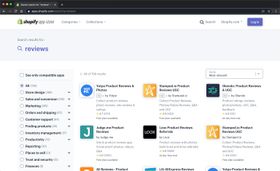
Product reviews apps let you collect reviews from your clients and display them in your Shopify store. 90% of your potential clients read social reviews before making an online purchase. So, product reviews are an essential part of any Shopify store. Social Proof Helps Build Trust The reviews serve as social proof for the quality of your products and services. They also help you to build trust. This trust is essential for improving the conversion rate of your store and increasing your sales. Reviews can even increase the traffic to your store. Product Reviews Are Good for SEO The reviews on your store are user-generated content that gets Google's attention. This content helps your site get better rankings on Google search result pages. Better ranking can drive more traffic to your Shopify store. An Opportunity to Communicate With Your Clients Getting reviews from your clients is also an excellent opportunity to communicate with them directly. The best review apps let you send automated review request emails to first-time clients. It gives you a chance to get feedback, improve your customer support, and increase their satisfaction. Worried About Negative Reviews? You Shouldn't Be Negative reviews allow you to contact unsatisfied clients and try to turn them into happy ones. It's also an opportunity to use negative feedback to help you improve your product and services. Showing only 5-star reviews on your store won't seem authentic. Having some negative reviews can also help to build trust. Product reviews apps let you manage reviews. So, you can always remove reviews if you feel that they are spammy or irrelevant. The best product reviews apps for your Shopify store Here are some of the best Shopify review apps that you should consider using - Stamped.io, Judge.Me, Loox, Yotpo, Shopify Product Reviews, Okendo, Reviews.io, Editorify.
Asked 2 months ago
Recent Posts
Can't find what you're looking for?
Join KeepShoppers’ Newsletter
Many entrepreneurs have signed up to receive tips, tricks, and news on how to run a successful eCommerce business.
By entering your email, you agree to receive marketing emails. Information is collected in accordance with our Privacy Policy. You can unsubscribe any time.